
See all blog posts in this series:
- OpenShift Virtualization on IBM Cloud, part 1: Introduction
- OpenShift Virtualization on IBM Cloud, part 2: Becoming familiar with VPC
- OpenShift Virtualization on IBM Cloud, part 3: Deploying ROKS, ODF, and OCP Virt
- OpenShift Virtualization on IBM Cloud, part 4: Creating a virtual machine
- OpenShift Virtualization on IBM Cloud, part 5: Migrating a virtual machine
- OpenShift Virtualization on IBM Cloud, part 6: Backup and restore
- OpenShift Virtualization on IBM Cloud, part 7: Dynamic resource scheduling
Introduction
IBM Cloud offers the opportunity to create virtual private clouds, which are software-defined network bubbles where you provision cloud resources and infrastructure into a network address space allocated and managed by you. For some more background, read and watch “What is a virtual private cloud?”
Our OpenShift resources will be provisioned into this VPC space. So first we need to create a VPC, and choose the network addressing. In addition, because this is a private network space, we will need to gain access to it. There are two common modes of access: VPN, and jump server. For the purposes of my experiment I created a jump server, which will also help to introduce us to some VPC concepts.
In this article I show you how to create an IBM Cloud VPC and jump server VSI (virtual server instance; i.e., virtual machine) using the IBM Cloud UI. Of course, you can also use the IBM Cloud CLI, APIs, or SDKs to do this as well. I have on GitHub samples of Python code to create a VPC and to create a jump server.
Create a VPC
After logging in to your IBM Cloud account, click the “hamburger menu” button in the top-left, then select Infrastructure | Network | VPCs.

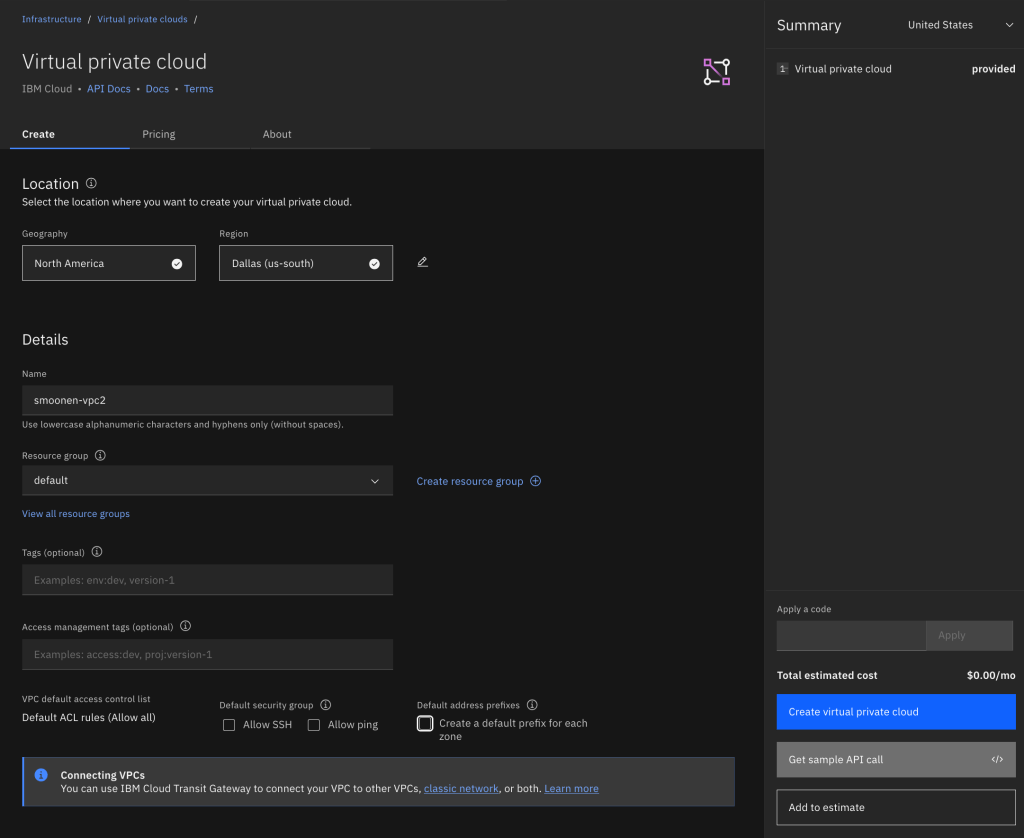
From the Region drop-down, select the region of your choice, and then click Create.

As it works currently, if you allow the VPC to create a default address prefix for you, the prefix will be automatically selected for you without your ability to modify it. I prefer to choose my own address prefix and therefore I deselect this checkbox before clicking the Create button.
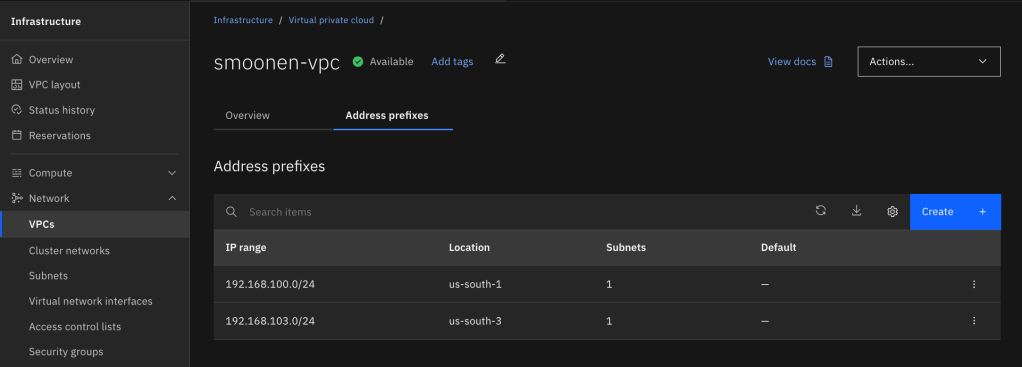
After creating your VPC, view the list of VPCs and click on your new VPC to display its details. Select the Address prefixes tab. For each zone where you plan to create resources or run workloads, create an address prefix. For example, I created a VSI in zone 1 and OpenShift worker nodes in zone 3, so I have address prefixes created in these two zones.
Interestingly, the address prefix is not itself a usable subnet in a zone. Instead, it is a broader construct that represents an address range out of which you can create one or more usable subnets in that zone. Therefore, you need to go to Infrastructure | Network | Subnets and create a subnet in each zone where you will be creating resources or running workloads. Note carefully that you choose the region and name of your subnet before you choose the VPC in which to create it. At that point you can choose which address prefix it should draw from. In my case I used up the entire address prefix for each of my subnets.
For your convenience, I also recommend that you choose to attach a public gateway to your subnet. The public gateway allows resources on the subnet to communicate with public networks, but only in the outbound direction.

Create a jump server
First you should create a security group to restrict access to the jump server. Navigate to Infrastructure | Network | Security groups and click Create. Ensure that your new VPC is selected, create one or more rules to represent the allowed inbound connections, and then create an outbound rule allowing all traffic.

Next, navigate to Infrastructure | Compute | Virtual server instances and click Create.
Select the zone and your new VPC. Note that the VPC selection is far down the page so it is easy to miss this. Choose your preferred operating system image; e.g., Windows Server 2025. Customize the VSI profile if you need more or different horsepower for your VM.
Unless you already have an SSH key, create a new one as part of this flow. The UI will save the private key to your system. Be sure to hold on to this for later.
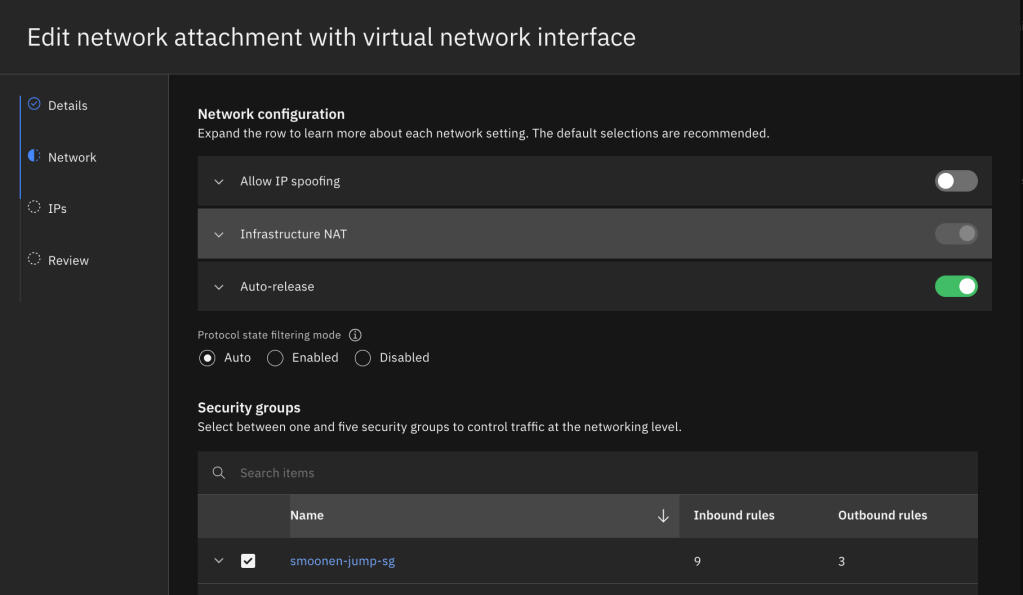
It is fine to take most of the default settings for network and storage unless you prefer to select a specific IP from your subnet. However, you do need to edit the network attachment and select the security group you created above instead of the VPC default group. You’ll notice that the creation of your VSI results in the creation of something called a virtual network interface, or VNI. The VNI is an independent object that mediates the VSI’s attachment to an IP address in your subnet. VNIs serve as an abstract model for such attachments and can be attached to other resources such as file storage and bare metal servers. You could elect to allow spoofing on your VNI (which would be necessary if you wanted your VSI to share a VIP with other VSIs or to route traffic for additional IPs and networks), and also to allow the VNI to continue to exist even after the VSI is deleted.
Click Create virtual server.
Jump server authentication
If you created a Linux jump server, you can use the SSH private key created earlier to connect to your jump server using SSH. However, if you created a Windows jump server, the Administrator password is encrypted using the SSH key you created earlier. Here is how you can decrypt the Administrator password using this key. Select your VSI. On the instance details panel, copy the VSI instance id.


Click the IBM Cloud Shell icon in the top right corner of the IBM Cloud UI. This will open a new tab in your browser. Ensure that your region of choice is selected.

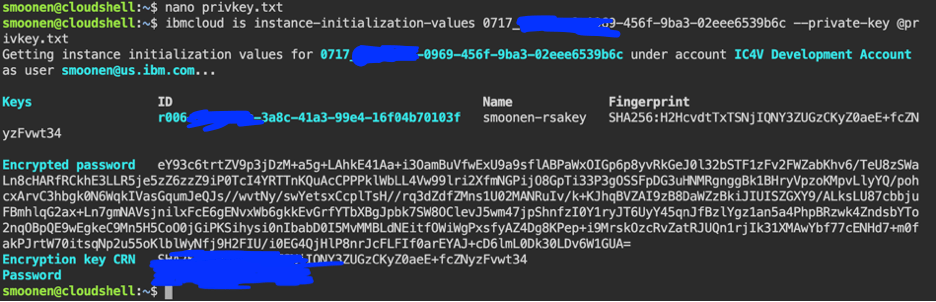
Within the IBM Cloud Shell in your browser, run a common editor to create a new privkey.txt file in the cloud shell; e.g., vi privkey.txt or nano privkey.txt. Locate the private key file that was downloaded to your system, copy its contents, paste them into the cloud shell editor, and save the file. Then run the following command in the Cloud Shell, substituting the VSI instance ID which is visible in the VSI details page:
ibmcloud is instance-initialization-values 0717_368f7ea8-0879-465f-9ab3-02ede6549b6c --private-key @privkey.txt
For example:
Public IP address
The last thing we need to do is assign a public IP to our jump server. Navigate to Infrastructure | Network | Floating IPs and click Reserve.
Select the appropriate zone, then select the jump server as the resource to bind to. Click Reserve. Note that we did not have to apply our security group at this point because it has already previously been applied to the VSI interface.
Note the IP that was created for you. You can now connect to your jump server using this IP and either the SSH key or password from earlier in this procedure.


One thought on “OpenShift Virtualization on IBM Cloud, part 2: Becoming familiar with VPC”