See all blog posts in this series:
- From VMware to IBM Cloud VPC VSI, part 1: Introduction
- From VMware to IBM Cloud VPC VSI, part 2: VPC network design
- From VMware to IBM Cloud VPC VSI, part 3: Migrating virtual machines
- From VMware to IBM Cloud VPC VSI, part 4: Backup and restore
- From VMware to IBM Cloud VPC VSI, part 5: VPC object model
- From VMware to IBM Cloud VPC VSI, part 6: Disaster recovery
- From VMware to IBM Cloud VPC VSI, part 7: Automation
- From VMware to IBM Cloud VPC VSI, part 8: Veeam Backup and Replication
In this blog post we’ll consider your options for a simple lift-and-shift migration of entire virtual machines from VMware to IBM Cloud VPC VSI. Although this is a one-size-fits-all approach, it may not be the only option depending on your situation. For example, if you have a well-established practice of automated deployment, you should consider retooling your deployment process (eventually you will need to do this anyway) so that you can deploy entirely new virtual machines in IBM Cloud and migrate your data, rather than migrating entire virtual machines.
There are no readily available warm migration approaches to migrate VMware workloads to IBM Cloud VPC VSI. You should plan for a sufficient outage window that includes stopping the original virtual machine, possibly exporting its disks, and transferring the disks at least once to the final destination.
Updated 2025–12–03: Change guidance on use of cloud-init; add notes on RedHat considerations; reorganize Windows considerations.
Updated 2026-01-23: Link to newly available additional resources.
Limitations
Currently you cannot create a VSI with more than 12 disks, nor can your VSI have a boot disk smaller than 10GB or larger than 250GB. If your boot disk is larger than 250GB you will have to restructure your VM before migrating it.
VPC VSI does not support shared block volumes. For some shared storage use cases, you may be able to leverage VPC file storage and attach it to multiple virtual machines (but note that IBM Cloud File Storage for VPC currently does not support Windows clients). This blog post does not address migration of such shared files to VPC file storage. If you have a need for shared block storage for use as a clustered file system, you could take the approach of deploying your own VSI and using it to expose an iSCSI target to other VSIs.
Using FSTRIM for your VSI is harmless but currently it does not have any effect.
Preparation
Broadly, you should prepare your system by (1) uninstalling VMware tools, (2) installing virtio drivers, (3) installing cloud-init, and (4) resetting the network configuration. IBM Cloud has existing documentation on migrating from classic VSI to VPC VSI which covers many of these points.
Note that because the initial setup of your VSI depends on cloud-init, this means that you should be prepared for it to modify certain parts of your system configuration as if it were a first-time boot even though this is not a true first-boot situation. For example, this could result in the resetting of your root or Administrator password, the re-generation of your authorized SSH keys, the reconfiguration of your SSHD settings, and the re-generation of host keys. You should carefully examine, customize, and test the cloud-init configuration and its side effects so that you are prepared for these.
Linux considerations
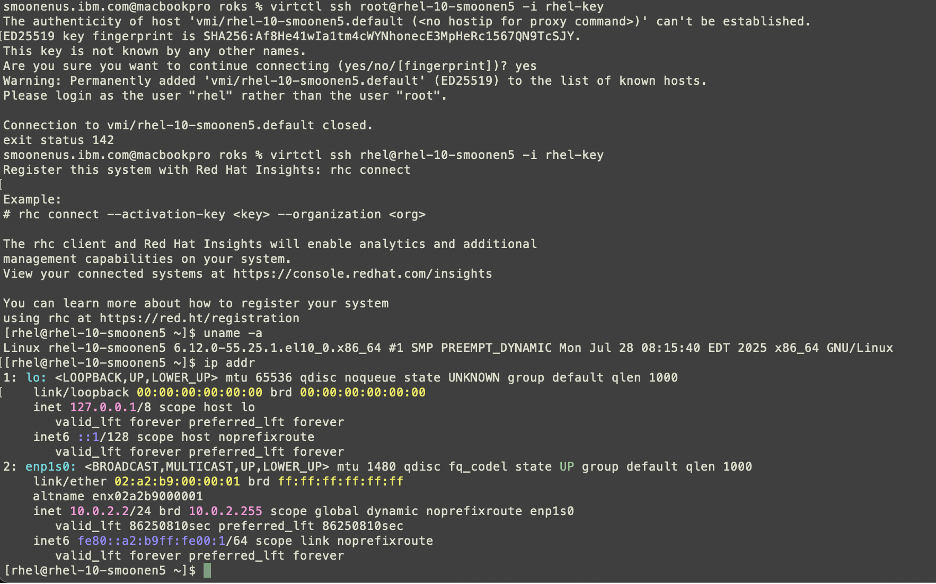
Installation of virtio is simpler on Linux than it is on Windows, to the degree that you could do so manually, but I still recommend that you use the virt-v2v tool in the steps described below.
If you are using RHEL and if you choose to obtain your license from IBM Cloud rather than to bring your own license (see further discussion below), the IBM Cloud VSI automation will expect to find your system registered with the IBM Cloud subscription and using the expected system UUID. You should check to be sure that you do not have a file /etc/rhsm/facts/uuid_override.facts that overrides the system’s UUID. Remove this file if it exists.
Your selected network configuration will be primed by a combination of cloud-init and DHCP, and you may also find that interface names change. Stale network configuration data can prevent the network configuration from fully initializing; for example, it could prevent your system from acquiring a default network route. You should clean out as much of the network configuration as possible. For example, on a typical RHEL 9 system, you should:
- Remove files in
/etc/sysconfig/network-scripts - Remove files in
/etc/NetworkManager/system-connections - Check
/etc/sysconfig/networkand make sure that noGATEWAYDEVis specified
If your system is unable to establish network connectivity including a default route at the time of first boot, it’s possible that the cloud-init registration process will fail.
Windows considerations
For Windows there are a number of important considerations related to installation of virtio drivers. First, you must source the drivers from RedHat. One way to do so is to deploy a RHEL VSI, install the virtio-win package, and copy the ISO file installed with this package, which includes various operating system drivers. You can find some instructions here. I copied the ISO to my Windows VM, mounted it as a drive, and ran the virtio-win-gt-x64 and virtio-win-guest-tools programs from the ISO.
Second, it is not sufficient to install the drivers. Even if you install the virtio drivers into your Windows VM, the drivers are typically bound to the device and you will not simply be able to boot your VM as a VSI successfully. There are two possible approaches:
- One approach is to use Microsoft’s
syspreptool to generalize your virtual machine immediately prior to migrating it. IBM Cloud’s VSI documentation suggests this approach. This ensures that driver assignment is released, but it also has many side effects and limitations that you should review and be aware of. You can control and limit some of this behavior if you use the Windows System Image Manager to generate an unattended answer file directingsysprep‘s execution. - Another approach is to use the
libguestfstoolkit, describe in detail below, to prepare the image. This toolkit is the basis for RedHat’s Migration Toolkit for VMware (MTV) that we saw used to migrate virtual machines to RedHat OpenShift Virtualization, and it is capable of injectingvirtiodrivers and also forcing Windows to make use of them. There are some important caveats to using thelibguestfstools outside of an MTV contest, for which see below. If you take this approach, be sure to shut down your Windows system cleanly. Thevirt-v2vtool will not process a Windows VM if it was not stopped cleanly.
I have had success using both of these approaches to transfer Windows VMs to VSI. I prefer the latter approach.
Third, you need to be sure to install the drivers in both your boot disk and your recovery image; note especially that the virt-v2v tool will only help with your boot disk. The IBM Cloud documentation provides some notes on the recovery image. In my own testing, I found some additional caveats:
- Your recovery image might not reside on a recovery volume; in fact, in my case, even though
reagentcreported that it was on a recovery volume, that volume was empty and I found it inC:\Windows\system32\Recoveryinstead. - If your drive is formatted as GPT instead of MBR, then:
- You may need to use
list volumeandselect volumeinstead oflist partitionandselect partition - Instead of setting the id to
07and27to mark it as data versus system, you will need to set the id first toebd0a0a2-b9e5-4433-87c0-68b6b72699c7, and afterwards toc12a7328-f81f-11d2-ba4b-00a0c93ec93b.
- You may need to use
Fourth, you should note that IBM Cloud VSI has a special rule that causes it to present a Windows boot disk as a virtio SCSI device, while presenting all other volumes as virtio block devices. This is in contrast with non-Windows VSIs, all of whose volumes are presented as block devices. What this means to you is that if you use the libguestfs approach to install the virtio drivers, you must add a special parameter to force the boot drive to be SCSI: --block-driver virtio-scsi.
Fifth, note that RedHat provides virtio drivers for only the following versions of Windows:
- Windows Server 2008 R2
- Windows Server 2012
- Windows Server 2012 R2
- Windows Server 2016
- Windows Server 2019
- Windows Server 2022
- Windows Server 2025
- Windows 7
- Windows 8
- Windows 8.1
- Windows 10
- Windows 11
In addition to virtio considerations, ensure that you install cloudbase-init. Note that I have had fewer difficulties with network configuration on Windows compared to Linux.
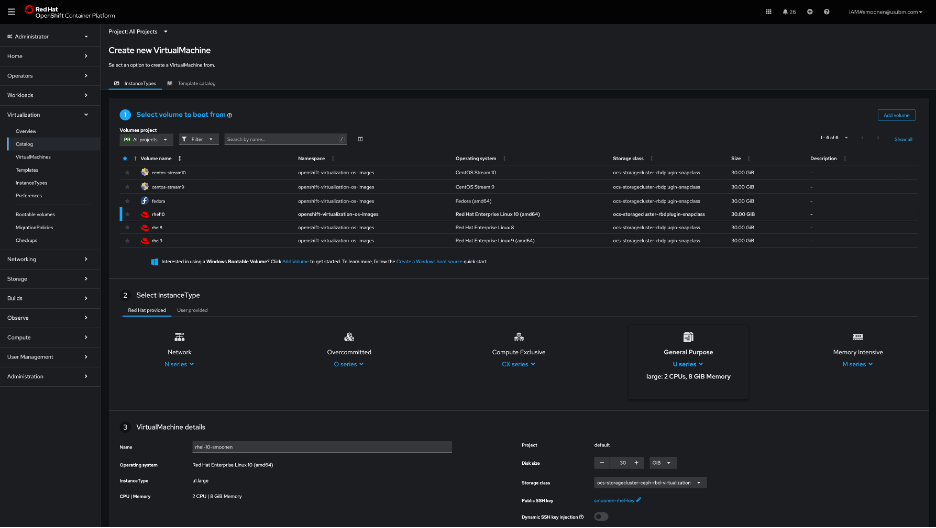
VSI images and boot volumes
When you create a VSI, a boot volume for that VSI is created based on an existing image template. A boot volume is a special kind of storage volume that has some attributes indicating its intended processor architecture, operating system, etc. The boot volume also exists as a kind of space-efficient linked clone of the original image. There are some variations of this boot process where you could base your boot volume on alternate images (e.g., using a custom image, or using a snapshot of another boot volume as the image template), or even choose to use an existing boot volume that is not already attached to an existing VSI. Note that currently it is not possible to boot a VSI using an ISO image.
The combination of these capabilities gives us several possible approaches to importing your virtual machine’s disks:
Migration methods
There are four broad approaches to migrating your virtual machine to VSI:
- Export the VM disk, import it to IBM Cloud as an image, and boot your VSI using this image
- Export the VM disks, copy them to IBM Cloud volumes (optionally using
virt-v2vto prepare the image), and boot your VSI - Boot your VM using an ISO image that is capable of reading and transferring its disks to a location where you will copy them to IBM Cloud volumes (optionally using
virt-v2vto prepare the image), then boot your VSI. Spoiler alert: this is my preferred method. - Extract your VM directly from vCenter using
virt-v2vVDDK capability to copy them to IBM Cloud volumes, and boot your VSI
The following image illustrates these approaches:

Understandably, there are a few caveats that you should be aware of. First we’ll discuss a few general caveats and then work through the various methods.
libguestfs use
Many of these migration approaches use the libguestfs toolkit, a powerful migration toolkit which includes the following capabilities:
- The
virt-v2vtool is able to transform virtual machine images on your local disk, including the installation ofvirtiodrivers. - When built with the
nbdkitVDDK plugin, thevirt-v2vtool supports an efficient direct connection to vCenter and your vSphere hosts to extract your image and transform it to your local disk. - The
virt-p2vtool can be used as one of the ISO options when booting your source VM to connect to the location where the VM will be processed and copied to local disk.
However, there are some important caveats to be aware of:
- It appears to me that the
libguestfstools leverageqemu-kvmto run some of their logic in a virtual machine context with the disk(s) attached to that virtual machine. If you are running them on an IBM Cloud VSI, you should note that nested virtualization is not formally supported. I have not encountered any problems using it in my testing. You could also leverage a VPC bare metal server as your conversion worker if you prefer. - If you are migrating a Windows VM, the
virtio-winpackage thatvirt-v2vuses to installvirtiodrivers is available only on RHEL. You will need to do your work on RHEL or else copy the/usr/share/virtio-wintree from a RHEL system to your work location. - The RHEL build of
virt-v2vdoes not support the--block-driver virtio-scsioption which is required to prepare drivers for Windows systems in IBM Cloud. You will either need to buildlibguestfsyourself, or else runvirtio-v2von a system other than RHEL (e.g., Ubuntu). - The RHEL build of
libguestfsincludes thenbdkitVDDK plugin, but the Ubuntu build does not. If you use Ubuntu you will either be unable to use the VDDK approach, or you will need to buildlibguestfsyourself. - Ubuntu provides the
virt-v2v-in-placecommand but RHEL does not. This command can be useful for some scenarios to avoid excess copying. - The
virt-v2vcommand usage only allows you to designate a destination directory for a VM’s disks, rather than destination files. So it does not naturally allow you to directly write the output to a/dev/vdXdevice. It is possible to trick it using symbolic links. So, for example, knowing that the virtual machine boot disk forsmoonen-winwill be namedsmoonen-win-sda, I can run the following:
ln -fs /dev/vdb /tmp/smoonen-win-sda
virt-v2v -i disk smoonen-win.img -o disk -os /tmp --block-driver virtio-scsi
General remarks about export
Not all of the methods we will discuss require you to export your virtual machine. But if you are exporting your virtual machine, there are some important considerations to be aware of.
If you are exporting a virtual machine from VCFaaS, you will need to stop your vApp and “download” it. This will initiate the download of an OVA file. The OVA file is in ZIP format and its contents include an OVF descriptor for your virtual machine(s) as well as VMDK files for the VM disks. Extract the VMDK files for use in subsequent steps.
If you are exporting a virtual machine from vCenter, you will need to stop the virtual machine. Although the datastore browser allows you to download the VMDK file directly from the VM folder, it seems to me that this approach ends up with a thick-provisioned VMDK. Instead I recommend using Actions | Template | Export OVF Template, which seems to preserve thin provisioning.
Method 1: import an exported virtual machine to VSI image
If your virtual machine has only one disk, a naive approach is to create an image template from your VMDK file and then boot a new VSI using this image. This approach is relatively simple and the VPC VSI documentation discusses how to do it. For a VMDK file, the steps are as follows:
- Convert VMDK to QCOW2, for example:
qemu-img convert -f vmdk -O qcow2 smoonen-ubuntu-1.vmdk smoonen-ubuntu-1.qcow2 - Go to IBM Cloud console and navigate to Infrastructure | Storage | Object Storage
- Find your existing COS instance and bucket or create a new one
- Click Upload. You will need to either enable large file web uploads, or else install and use Aspera to upload the qcow2 image.
- There are multiple ways to expose the image to the VPC image service. The simplest is to enable public object reader access for your COS bucket.
- Navigate to Infrastructure | Compute | Images
- Select your desired region
- Click Create
- Enter a name, e.g.,
smoonen-ubuntu-migrated - Select COS and indicate your image URL
- Choose the appropriate OS type; note there are BYOL and non-BYOL options
- Select how to encrypt the image. Note that image encryption is independent of VSI disk encryption
There are, however, some caveats and downsides to this approach. As mentioned above, this only migrates a single disk, so you will need to use one of the techniques below for secondary disks. More importantly, this process is abusing the notion of an image, which is intended to serve as a reusable template. Instead, this approach creates a single image template for every single virtual machine. This is relatively inefficient and wasteful; William of Ockham would not approve.
Method 2: copy an exported virtual machine to VPC volumes
Instead of uploading your disk as a VPC image, you could write out your VM disks directly to volumes by temporarily attaching them to another VSI to perform this work. This process is slightly convoluted because you have to create and delete an ephemeral VSI just to create a boot volume in the first place. An optional first step in this process allows you to take advantage of linked clone space efficiency if you choose to upload your own virtual machine template as a custom VSI image. Here are the steps:
- Optionally, if you have a copy of the original disk template for your virtual machine, follow the process in method 1 above to import this template as a custom image. If you use this custom image as the basis for the boot volume in step 3 below, you will gain some storage efficiency from the linkage between the image and every boot volume that you create from it.
- Create a worker VSI with sufficient disk or secondary disk space to hold VMDK files as a working set. Copy your virtual machine VMDKs to this VSI.
- Create an ephemeral VSI that mimics your migrated VM, with appropriate OS and disk configuration. Network configuration can be throwaway. Note that by default this will be an IBM-licensed operating system unless you create and use a custom BYOL image.
- Important: ensure that none of the volumes are configured to auto-delete
- Important: ensure that the boot volume uses the
general-purposestorage profile
- Delete this ephemeral VSI. You have to do this in order to free up the volume(s) for attachment to your worker VSI.
- Attach the volume(s) to your worker VSI. If you have multiple volumes, note well the order in which they are attached. You can probe the volume size by using, for example:
blockdev --getsize64 /dev/vdb. - Convert the VMDK to raw format and write it to the block device, for example:
qemu-img convert -f vmdk -O raw smoonen-ubuntu-1.vmdk /dev/vdb - If you have chosen to use
virt-v2v-in-place(orvirt-v2vwith a second copy) to transform your image (for example, to installvirtiodrivers) run it now. - Spot check partition table:
fdisk -l /dev/vdb. Note that if you have resized the boot disk, this may rewrite the backup GPT to the appropriate location. - Flush buffers:
blockdev --flushbufs /dev/vdb - Detach the volume(s) from your worker VSI.
- Create a new (again) VSI for the migrated VM with appropriate network, OS, and disk configuration. Instead of booting from an image, you will boot from the existing boot volume you created in step 3 and populated in step 6.
- Important: Currently the IBM Cloud UI does not allow you to attach existing secondary volumes. You can do this using the IBM Cloud CLI or API, or if you wish to use the UI, you could stop the VSI, attach the volume, and then restart it.
- Important: You must select an SSH key which will be provided to
cloud-init
- Expand or add partition to your boot volume if you had to resize it upwards.
Method 3: ISO boot virtual machine to copy to VPC volumes
As a variation on the previous method, instead of exporting your virtual machine disks, you could boot your virtual machine using an ISO that is capable of reading the disks and transferring them to your worker VSI that will process them and copy them to VPC volumes. This approach is inspired by the old GHOST tool.
In order to do this, you will likely need to create an IBM Cloud Transit Gateway to connect your source environment (whether in IBM Cloud classic or in IBM Cloud VCFaaS) to the destination VPC where your worker VSI lives. This enables direct network connectivity between the environments.
One approach, noted above, is to use the virt-p2v tool to generate a boot disk from which you will initiate a network connection to your virt-v2v worker to transfer your virtual machine disks.
You could also boot your virtual machine using your preferred (ideally tiny) Linux distribution such as TinyCore Linux, or using a tool such as G4L. However, note that the smaller the distribution, the more likely it is that you would need to customize it or connect it to public repositories to include needed tools. (For example, I found that TinyCore Linux was missing openssh and qemu packages out of the box.) In my case, I had an Ubuntu install ISO handy, and so I attached that to my original virtual machine and booted into it. For the Ubuntu install ISO, if you select the Help button you will find an Enter shell option that allows you to run commands.
The approach I took was to use the dd command to read and write the disks, combined with the gzip command to help with network throughput, combined with the netcat command to transfer over the network. On the destination worker VSI, I ran the following:
nc -l 192.168.100.5 8080 | gunzip | dd of=/dev/vdd bs=16M status=progress
fdisk -l /dev/vdd
blockdev --flushbufs /dev/vdb
On the source side, I had to configure networking, and then ran the following:
# Note that network device name may vary, e.g., depending on BIOS vs. UEFI
ip addr add 10.50.200.3/26 dev ens192
ip route add 0.0.0.0/0 via 10.50.200.1
dd if=/dev/sda bs=16M | gzip | nc -N -v 192.168.100.5 8080
After transferring the disk you could use virt-v2v-in-place or virt-v2v to further transform the disk. Then, as with method 2, you should detach the volumes from your worker VSI and create the VSI that will make actual use of them.
This method is my favorite method, partly because of its efficiency (export of VMDK and OVA is inefficient) and partly because of its flexibility.
Method 4: Direct copy to VPC volumes using VDDK
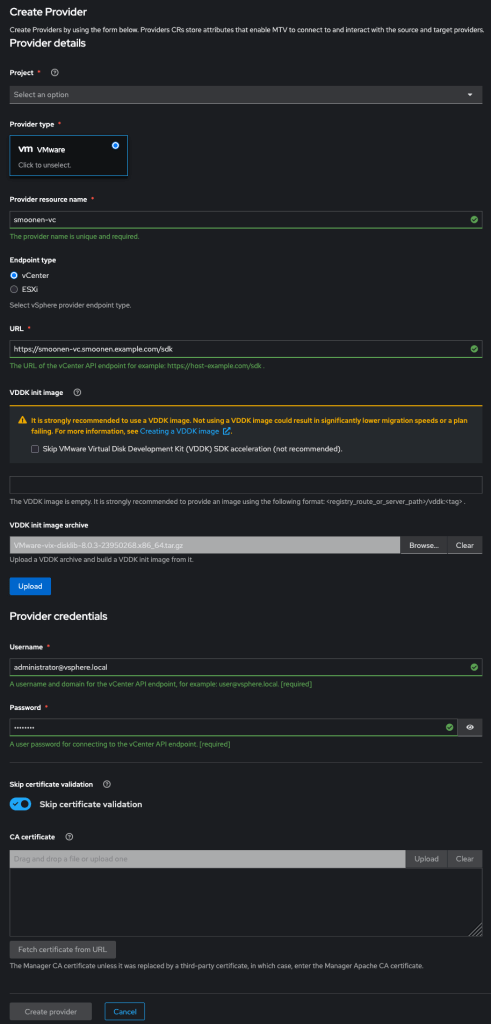
As noted above, it is possible to leverage virt-v2v together with the VMware VDDK toolkit to connect to vCenter and vSphere and directly fetch the virtual machine disks to your worker VSI as well as performing other virt-v2v processing such as installation of virtio drivers. This is quite convoluted due to competing RHEL and Ubuntu limitations, and so it is not currently my preferred method, but it is possible to get it working. This method is available only if you have access to vCenter; it is not applicable to VCFaaS.
You may need to input your vCenter and vSphere hostnames into /etc/hosts to ensure this works. You will also need to know or discover the specific host on which your virtual machine is running. Here is an example command invocation. Note that your vCenter password is specified in a file, and your userid needs to be expressed in domain\user form. You’ll also need to determine the vCenter certificate thumbprint.
virt-v2v -ic vpx://vsphere.local\%5cAdministrator\@smoonen-vc.smoonen.example.com/IBMCloud/cluster1/host000.smoonen.example.com\?no_verify=1 \
 smoonen-win \
 -ip passwd \
 -o disk -os /tmp \
 -it vddk \
 -io vddk-libdir=vmware-vix-disklib-distrib \
 -io vddk-thumbprint=A2:41:6A:FA:81:CA:4B:06:AE:EB:C4:1B:0F:FE:23:22:D0:E8:89:02 \
 --block-driver virtio-scsi
Post-migration and other considerations
The processes outlined above are somewhat tedious. One implication of this is that you will need to carefully develop and test your process around this. This will also enable you to form an estimate of how long the process will take based on network and disk copy times. Portions of this process can be automated, and you can also perform migrations in parallel.
You may also want or need help in executing this. For this purpose, you could reach out to IBM Consulting. IBM Cloud also has partnerships with PrimaryIO and Wanclouds who can provide consulting services in this space.
Additional resources
My colleague Shinobu Yasuda has written a step-by-step VSI migration guide, including screenshots, demonstrating how he successfully migrated a variety of RHEL and Windows releases from vCenter to VPC VSI.
Previously, IBM Cloud published documentation exclusively recommending the image import method; IBM Cloud has recently published new documentation focused on direct migration to boot volumes, including the migration of VMDK files, the direct network transfer of VM disks, and direct connection to vCenter using VDDK.