OpenShift Virtualization on IBM Cloud, part 7: Dynamic resource scheduling
For KubeVirt virtual machines, it’s possible to use pod affinity specifications to designate both affinity and anti-affinity rules for your virtual machines.
However, you have to take some extra steps to enable dyanamic resource scheduling (what in the VMware world is called DRS—distributed resource scheduler). After following these steps, the system will periodically rebalance your virtual machines, taking into account any affinity and anti-affinity rules as it does so.
Install and configure Descheduler
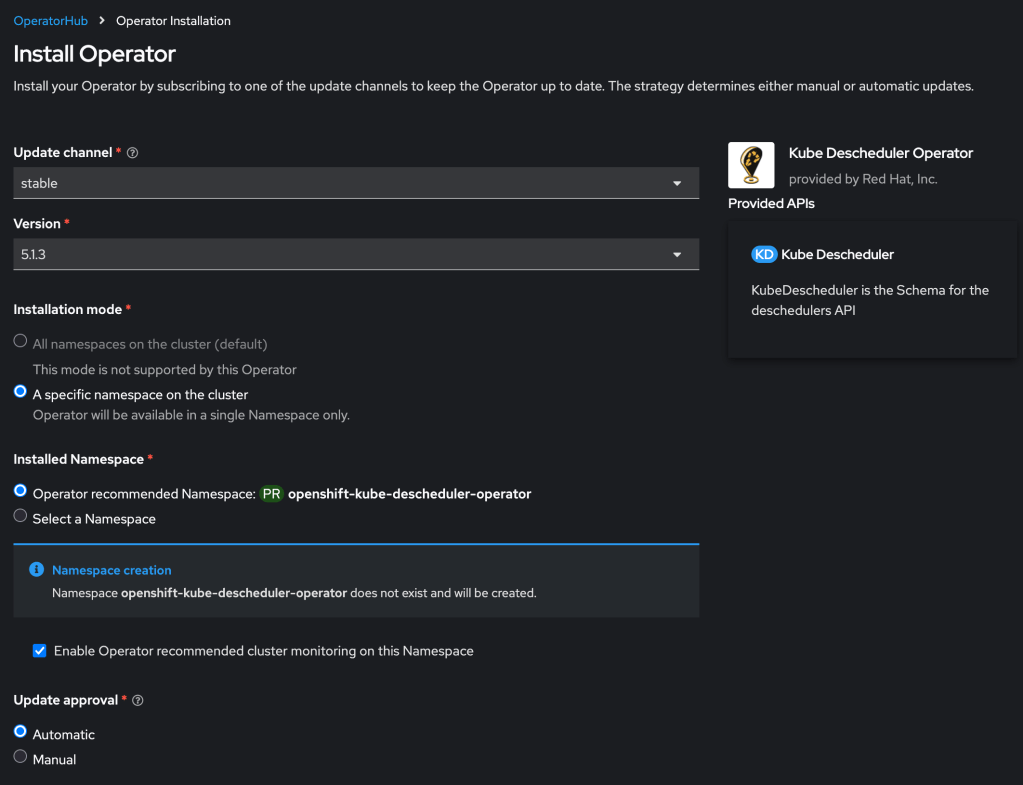
First you must install the descheduler tool which performs the dynamic scheduling. RedHat provides a supported form of this using their Kube Descheduler operator, which is available in your cluster in the OperatorHub.
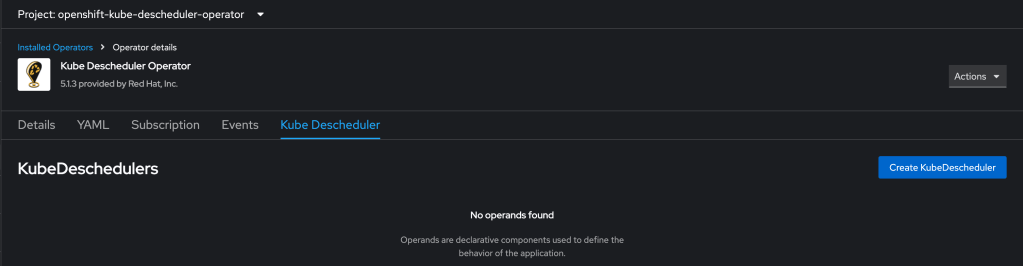
Then you need to create a KubeDescheduler resource describing your rescheduling plan:
Working with the RedHat KubeDescheduler documentation and some failed attempts at experimentation, I crafted the following example definition. Note that currently this leverages two dev keywords that will be folded into the product formally over time.
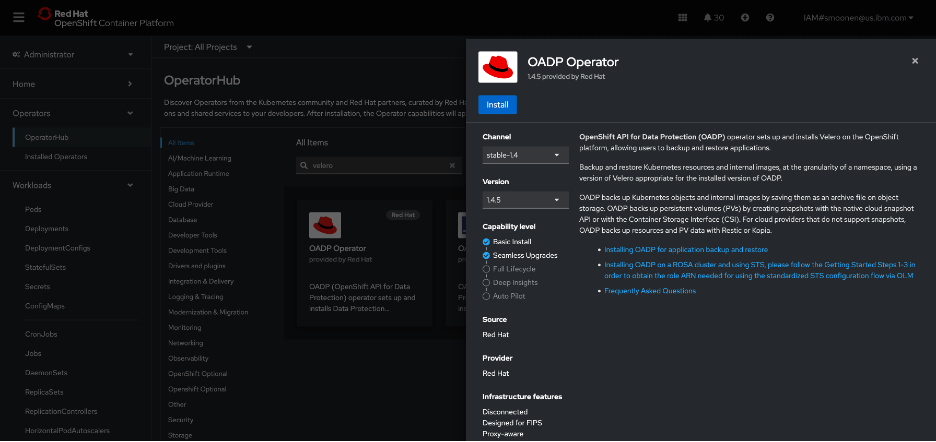
In this post we will leverage the OpenShift APIs for Data Protection (ADP) using Velero and Kopia to backup and restore our virtual machines.
Installation
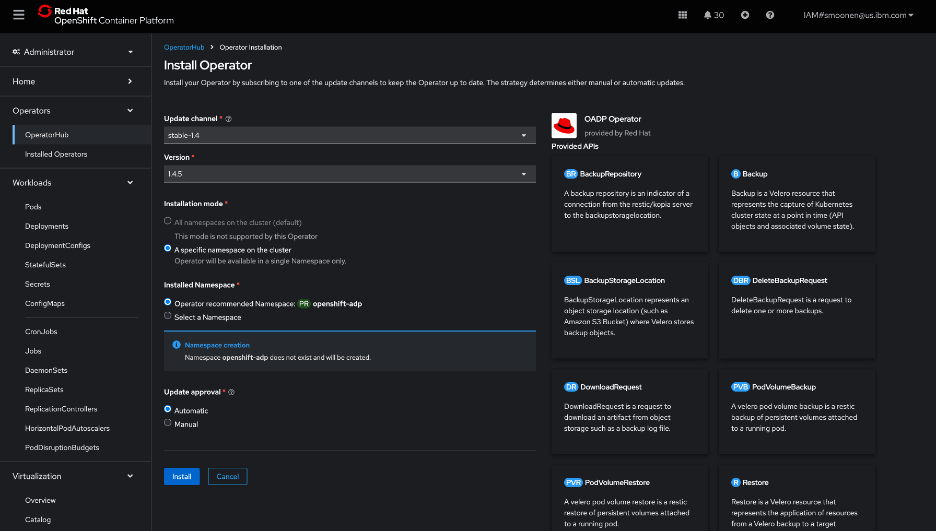
RedHat’s OpenShift APIs for Data Protection (OADP) leverages Velero to provide backup capabilities. In my OpenShift web console, I visited the OperatorHub and installed the RedHat OADP Operator.
I then created an IBM Cloud Object Storage bucket. I created a service ID and created HMAC credentials for it. For reference:
Following the OADP instructions, I created a credentials-velero file holding the HMAC credentials and a default secret based on it.
I then created and applied a DataProtectionApplication YAML modeled from the OADP instructions and including my bucket details. Some noteworthy points:
I used the VPC “direct” URL. Note that you need to prefix this URL with “https://”.
Note also that I have added the “kubevirt” plugin as we will be needing this later.
Kopia sems to be recommended as a preferred data mover for kubevirt over Restic. I have specified this below.
I followed the steps to verify that this was deployed properly.
Next I created a schedule to run an hourly backup of the default namespace in which my new and migrated VM live. I could have chosen to provide a selector to backup specific VMs but for now I am not doing so. Notice that the defaultVolumesToFsBackup parameter is commented out; I had originally believed that this should be specified, but read on for some confirmation that this is not needed for ODF-backed virtual machines at least. Note also that this is a similar format to what is needed for a point in time backup, except that much of the configuration is here nested under template.
Browsing the controller logs, it appears that there were failures related to pods not being in running state. This was the case for me because I had some prior migration attempts failing for various reasons such as lack of access to the VDDK image.
I then installed the Velero CLI to see what additional insight it would give me. It seems to automatically integrate with oc. It is able to provide some insights, but interestingly, it attempts to extract some data from IBM Cloud Object Storage which it is unable to do because I am attempting to access using the direct URL from outside of a VPC.
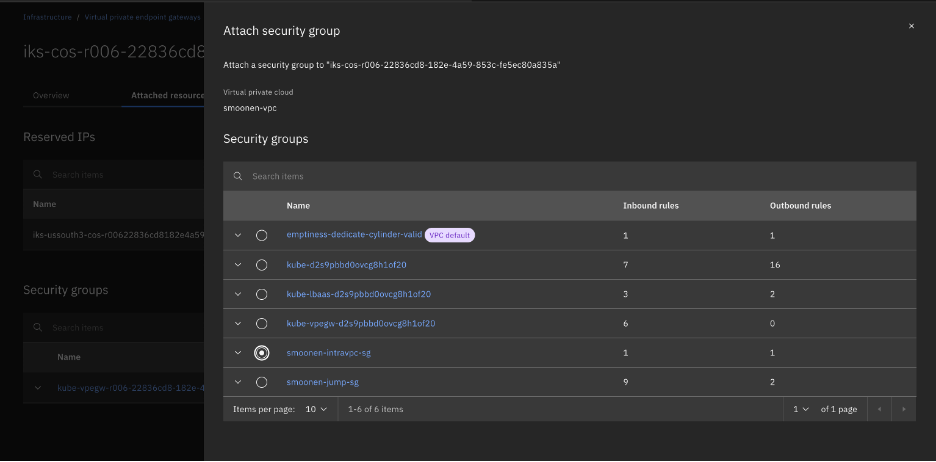
So I switched to running oc and velero on my VPC VSI jump server. When doing this, I discovered that the reason direct access to the COS storage was working for me at all was because ROKS had already automatically created a VPE in my VPC for COS direct access. I had to expand the security group for this VPE to allow my jump server to connect.
After doing so, the commands are now successful. Most of the errors and warnings were as I expected, but there were also warnings for block volumes for my two virtual machines that cause me to second-guess the use of FS backup as noted above.
Therefore I updated my schedule to remove the FS backup as noted above. This significantly reduced my errors. I also identified and cleaned up a leftover PVC from a failed migration attempt. Digging into the PVCs also led me to archive and delete my migration plan and migration pod in order to free up the PVC from the successful migration.
My next backup completed without error.
Kopia seems to be appropriately processing snapshots incrementally; or if not, it is doing an amazing job at deduplication and compression. For my two VMs, with a total storage of 55GB, my COS bucket storage increased by 0.1GB between two successful backups. Collecting a longer series of backups, the storage increase reported by COS seems to be around 0.17GB per increment.
I next attempted to restore one of these backups to a new namespace.
In this post, we will install the OpenShift Migration Toolkit for Virtualization and use it to migrate a VMware virtual machine to OpenShift Virtualization.
Install the migration toolkit
In the OpenShift web UI, navigate to Operators | OperatorHub and search for “migration.” Select the “Migration Tookit for Virtualization Operator” then click “Install.” I didn’t customize any of the parameters.
Afterwards this prompted me to create a custom resource for the ForkliftController.
In time a Migration for Virtualization menu item appears in the web UI.
Preparation
I deployed an Ubuntu VM into an overlay network in an IBM Cloud “VCS” instance (AKA “VCF on Classic Automated”) and connected my classic account to my VPC using an IBM Cloud Transit Gateway. This particular VCS instance was leveraging NFS storage.
Interestingly, VMware disables CBT by default for virtual machines. I found later in my testing that the migration provider warned me that CBT was disabled. I followed Broadcom’s instructions to manually enable it although this required me to reboot my VM.
In order to create a migration provider, RedHat recommends you create a “VDDK image.” Recent versions of the Migration operator will build this for you, and all you need to do is provide the VDDK toolkit downloaded from Broadcom. See RedHat’s instructions.
Although the migration provider is able to connect to vCenter by IP address rather than hostname, the final migration itself will attempt to connect to a vSphere host by its hostname. Therefore we need to prepare the environment to delegate the VCS instance domain to its domain controllers. I followed the RedHat instructions to configure a forwarding zone in my DNS controller. Here is the clause that I added.
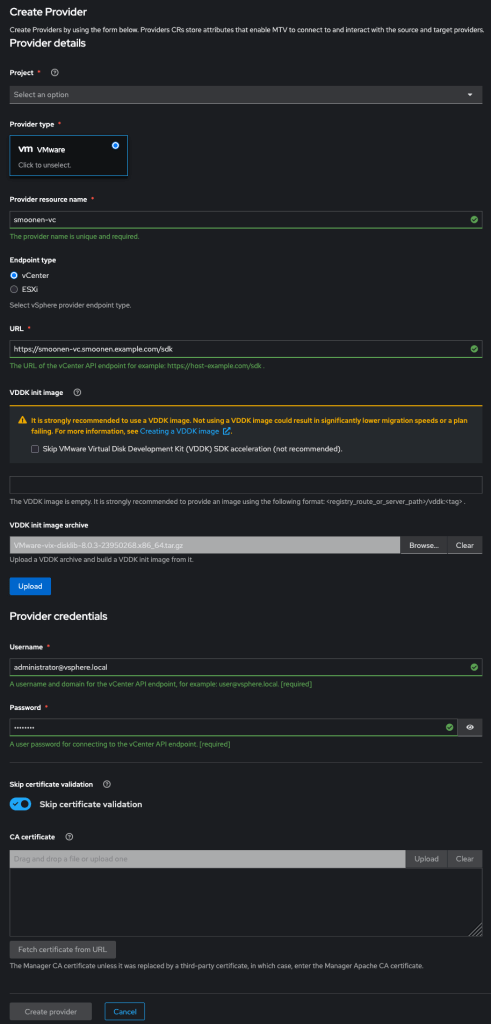
I then went into the Providers view in the OCP web UI and created a VMware provider. Be sure to add /sdk to the end of your vCenter URL as shown below. Note also that the migration operator automatically creates a “host” provider for you, representing your OCP cluster, in the openshift-mtv project. In order to meaningfully migrate your VMs to this provider, it is best to create your VMware provider in the same project.
Create the migration plan
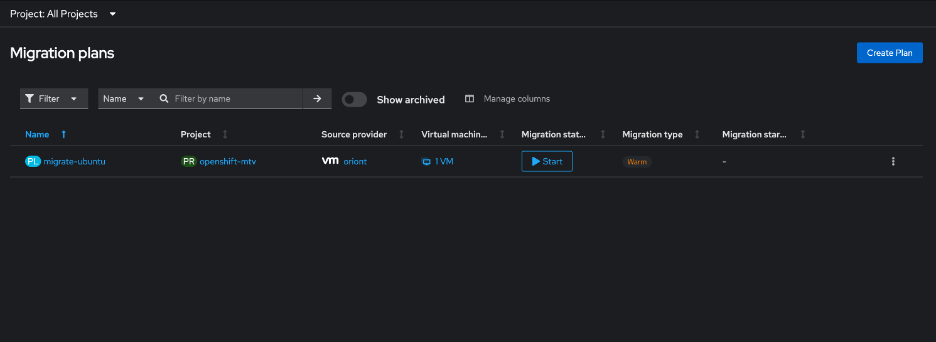
In the OpenShift web console I created a migration plan.
Then I selected my virtual machine.
Then I created a network mapping. The only currently supported network mapping in IBM Cloud ROKS is the pod network.
Then I created a storage mapping, being sure to select the ODF storage.
Then I chose a warm migration.
The preservation of static IPs is not currently supported in ROKS with the Calico provider.
I chose not to create migration hooks. You could use these, for example, to reconfigure the network configuration.
In my migration plan I chose to migrate the VM to the default project. My migration plan actually failed to initialize because it could not retrieve the VDDK image that had been built for me. Either before or after creating the migration plan, run the following command to ensure that it can access the cluster’s image registry:
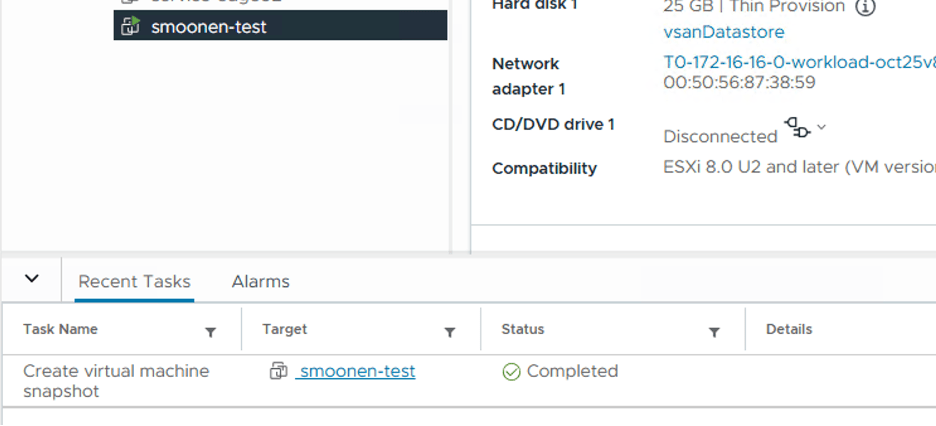
The migration created a snapshot and left my VM running.
After this completed, the VM remains running on the VMware side and is not yet instantiated on the ROKS side. The migration plan appears in a “paused” state.
Next I performed the cutover. I had a choice to run it immediately or schedule it for a future time.
The cutover resulted in the stopping of my VM on the VMware side, the removal of the snapshot, and the creation and removal of an additional snapshot; I presume this represented the replication of the remaining data as signaled by CBT.
It then created and started a VM on the ROKS side.
In order to establish network connectivity for this VM, it was necessary to reconfigure its networking. The static IP must be exchanged for DHCP. In my case I also found that the device name changed.
For completeness I also installed qemu-guest-agent but it appears this is not strictly necessary. I then edited /boot/efi/loader/loader.conf to force the loading of virtio modules per Ubuntu instructions. After doing so, it appears that they are in use.
In theory, MTV should have both triggered the installation of qemu-guest-agent as well as the installation of the virtio drivers. I observed that on first boot it did attempt to install the agent, but understandably failed because the network connction was not yet established.
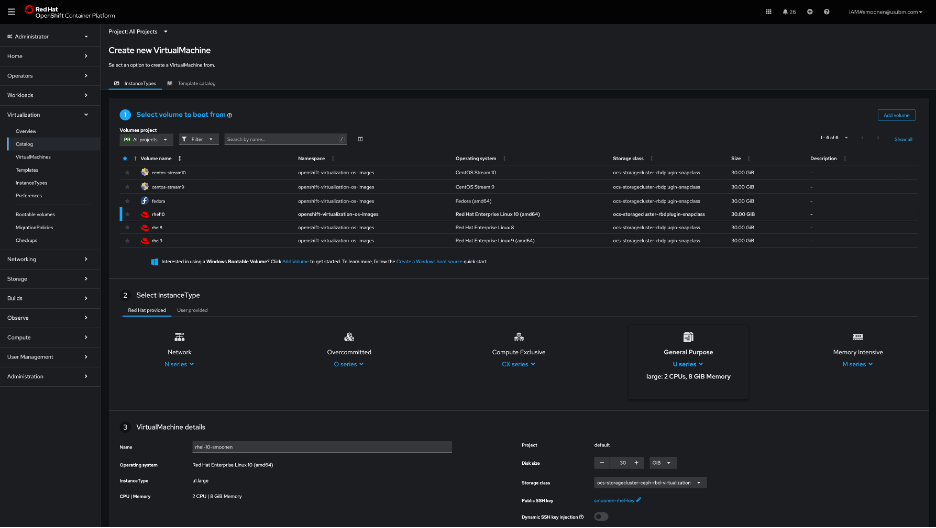
I had some initial difficulties creating a virtual machine from the OpenShift web console UI in the Virtualization | Catalog page, but later this worked okay. Here is a screenshot of that page, but in this post I will document a command-line approach.
For my command-line approach, I first used ssh-keygen to create an SSH key pair, and then created a secret based on the public key:
I then created a YAML file, referencing this secret, and with the help of the example YAML generated by the OpenShift console UI. Here is my configuration:
I applied this by running the command oc apply -f virtual-machine.yaml.
Connecting to the virtual machine
I relied on this blog post which describes several methods for connecting to a virtual machine.
I chose to use virtctl/SSH. Steps:
Login to OpenShift web console
Click question mark icon in top right and select Command Line Tools
Scroll down and download virtctl for your platform.
If you are on a Mac, follow the same steps performed earlier with oc to allow virtctl to run.
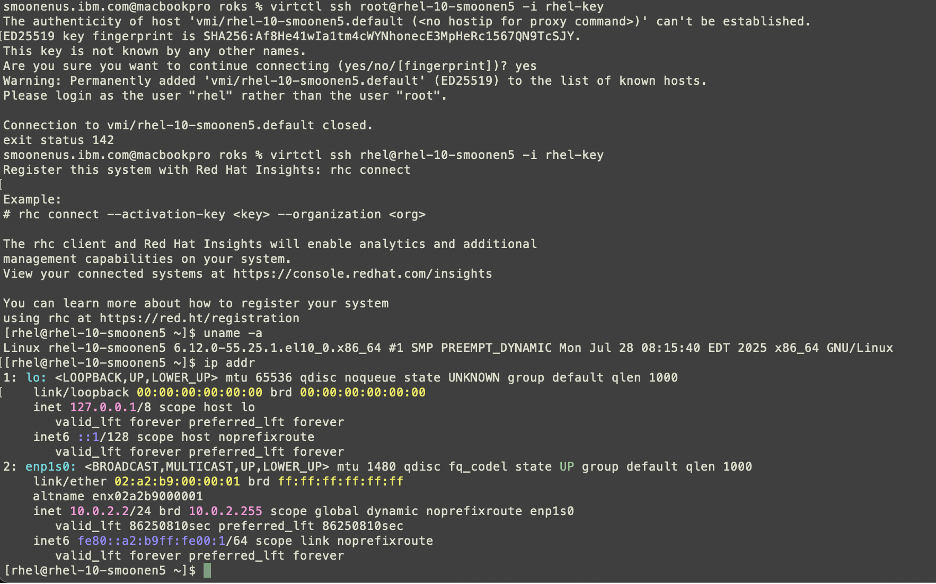
Here you can see me connecting to my virtual machine.
Performance
Be sure to read Neil Taylor’s blog posts referenced in the first post in this series, which explain why this has an address of 10.0.2.2.
As it stands it can reach out to the public network, since I configured a public gateway on the worker nodes’ subnet. Although I believe I have entitlement to run RHEL on these workers, the VM is not initially connected to a Satellite server or to any repositories. I wanted to run a quick iperf3 test, but this makes it not as simple as doing a yum install. I was able eventually to snag libsctp and iperf3 RPMs and ran a simple test. Compared to a VMware VM running on VPC bare metal, the ROKS VM gets comparable throughput on iperf3 tests to public servers.
As I receive more insight into the RHEL entitlement I will document this.
Inbound connectivity to VM
NLB (layer 4) does not currently support bare metal members. Therefore we need to create an ALB (layer 7). I created a public one just to see how that works. I’m reasoning through what I need to build based on Neil’s blog and IBM Cloud documentation.
Importantly, you should not specify the service.kubernetes.io/ibm-load-balancer-cloud-provider-vpc-lb-name annotation; what IBM Cloud calls a persistent load balancer. This reuses an existing load balancer of that name if it exists. So, for example, if you have a scenario where you are testing restore of an application to a new and temporary namespace, it will hijack the load balancer for your running application.
After provisioning this, I was able to successfully SSH into my VM with the load balancer resource that was created.
In this article we will work through the steps of creating a ROKS cluster, deploying and configuring prerequisites for OpenShift Virtualization, and installing OpenShift Virtualization.
Create ROKS instance
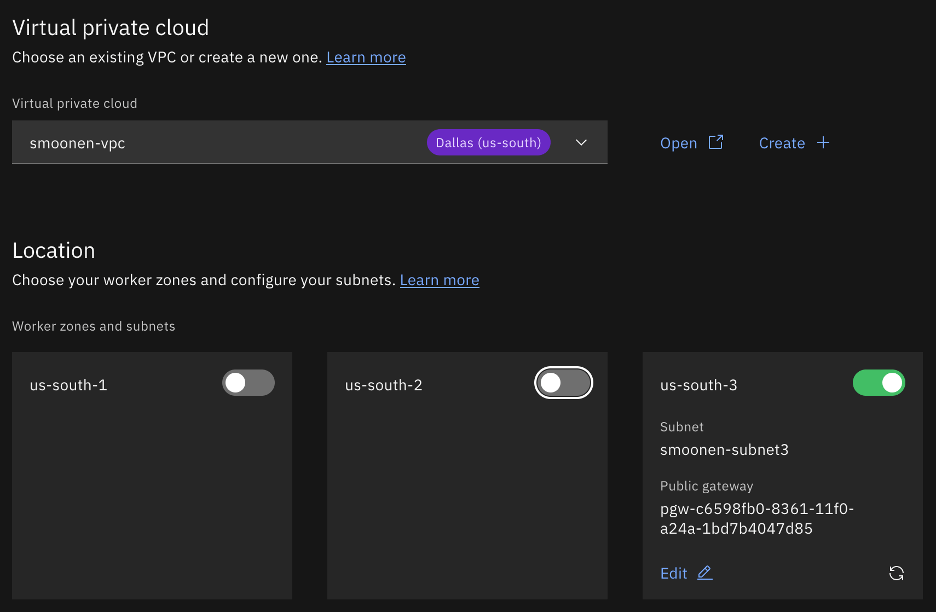
Click on the IBM Cloud hamburger menu and select Containers | Clusters. Click Create cluster. Ensure that RedHat OpenShift is selected and VPC is selected. Choose your VPC and select the region and zone(s) of interest. For the purpose of my testing I am creating a single zone.
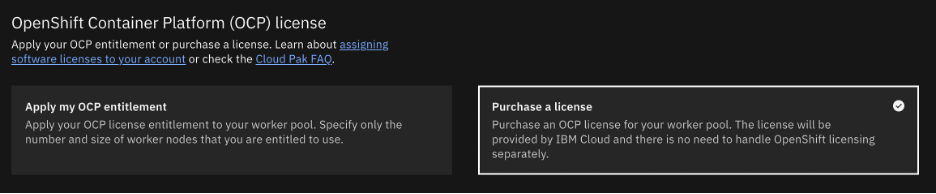
Select OCP licensing as you require. In my case I needed to purchase a license.
Take care in your selection of worker nodes. Currently virtualization is supported only with bare metal worker nodes. In my case I selected three bare metals each with some amount of extra storage which I will use for Ceph/ODF software-defined storage.
If you wish, encrypt your worker node storage using Key Protect.
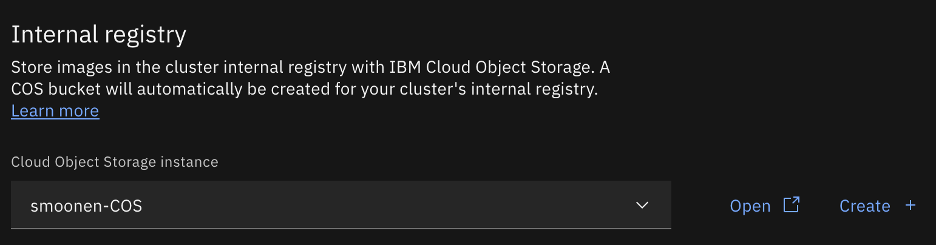
I chose to attach a Cloud Object Storage instance for image registry.
I thought at first that I would enable outbound traffic protection to learn how to make use of it. However, the OpenShift Virtualization operator documentation indicates that you should disable it.
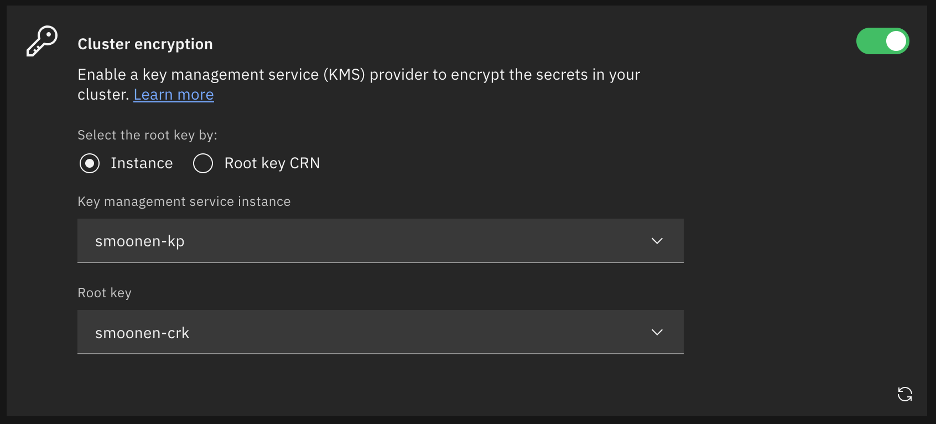
I selected cluster encryption as well.
At present I chose not to leverage ingress secrets management or custom security groups.
Enable activity tracking, logging, and monitoring as needed, then click Create.
Note: it is wise to open a ticket to ask for assistance from IBM Cloud support to check for bare metal capacity in your chosen VPC region and zone. In my case my first deployment attempt failed as insufficient bare metals of my selected flavor were available in the zone; this is why I have a jump server in zone 1 but workers in zone 3. Although my second deployment had one host fail, this was not due to capacity but apparently to an incidental error. Redeploying a new worker in its place worked fine. It’s difficult to assess the total deployment time in light of these errors, but I would guess it was somewhere between 2-3 hours.
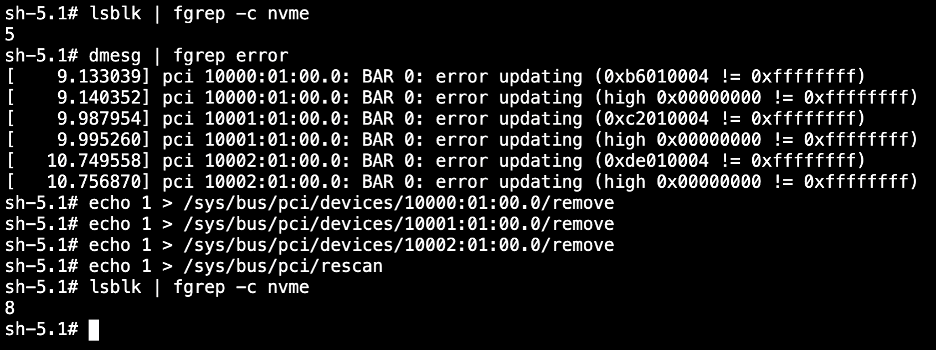
Check NVMe disks
At the time of this writing, recent CoreOS kernel versions appear to have a bug where several NVMe drives are not properly mounted. After the cluster is provisioned, login to the OpenShift web console and use the Terminal feature on each host to display whether your system has all of its NVMe disks. For example, the profile I deployed should have 8 disks. If there are missing disks, follow the steps in the screenshot below to rediscover them, using the ids from the error messages.
ODF is a convenient wrapper for software-defined storage based on Ceph. It is the OpenShift equivalent of VMware vSAN. In this case I’m deploying a single zone / failure domain, with a default configuration of 3-way mirroring, but ODF is able to provide other configurations including multiple zonal fault domains.
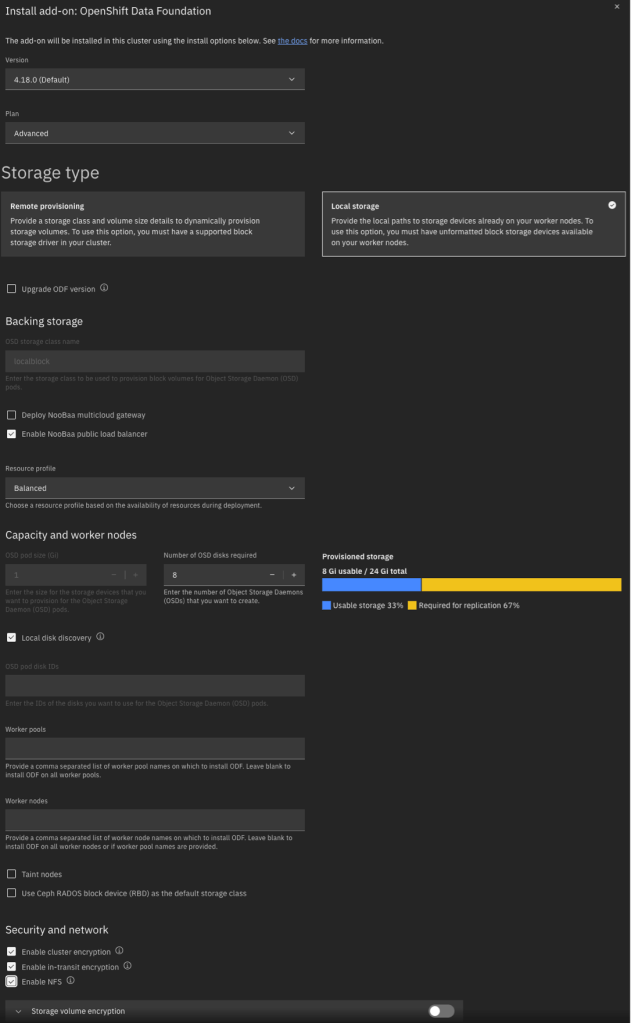
Because it must be licensed and in order to provide other custom integrations with IBM Cloud, the ODF installation is driven from the IBM Cloud UI rather than from the OpenShift OperatorHub. In the IBM Cloud UI, on your cluster’s Overview tab, scroll down and click Install on the OpenShift Data Foundation card.
Below is an example of the input parameters I used. Note that I did not enable volume encryption because the integration with KP and HPCS was not clear to me. Most importantly, you should be careful with the pod configuration. For local storage, ignore the fact that the pod size appears to be 1GiB. This simply indicates the minimum claim that ODF will attempt; in reality it will be greedy and will make use of your entire NVMe drive. Also for the number of pods, specify the number of NVMe disks on each host that you want to consume. Although I have three hosts, I have 8 NVMe disks on each host and wish to use all of them. For this reason I specified a pod count of 8.
Note that it takes some time to install, deploy, and configure all components.
Install OpenShift Virtualization
After the ODF installation completes, you need to install the OpenShift Virtualization operator using the OpenShift CLI (oc). Although the IBM Cloud CLI has an “oc” operator, this is not a proxy for the oc CLI but rather an alias for IBM’s ks plugin. I performed the following steps:
First, in the IBM Cloud UI, click through to the OpenShift web console. In the top-right corner, click the ? icon and choose Command Line Tools. Download the tool appropriate to your workstation.
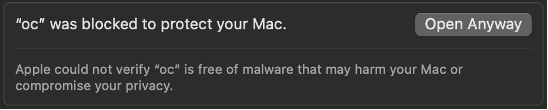
In my case, on MacOS, I had to override the security checks for downloaded software. I attempted to run oc and received an error. I then opened the System Settings app, selected Privacy & Security, scrolled to the bottom, and selected “Open Anyway” for oc.
Then, in the IBM Cloud UI, I clicked through to the OpenShift web console. In the top-right corner I clicked on my userid and then selected Copy login command. Then I ran the login command on my workstation.
I have some thoughts on what the upgrade process might look like for ODF / Ceph when upgrading my cluster and worker nodes. I’m waiting for a new supported release of ODF to test these out and will post my experience once I’ve had a chance to test it.
IBM Cloud offers the opportunity to create virtual private clouds, which are software-defined network bubbles where you provision cloud resources and infrastructure into a network address space allocated and managed by you. For some more background, read and watch “What is a virtual private cloud?”
Our OpenShift resources will be provisioned into this VPC space. So first we need to create a VPC, and choose the network addressing. In addition, because this is a private network space, we will need to gain access to it. There are two common modes of access: VPN, and jump server. For the purposes of my experiment I created a jump server, which will also help to introduce us to some VPC concepts.
In this article I show you how to create an IBM Cloud VPC and jump server VSI (virtual server instance; i.e., virtual machine) using the IBM Cloud UI. Of course, you can also use the IBM Cloud CLI, APIs, or SDKs to do this as well. I have on GitHub samples of Python code to create a VPC and to create a jump server.
Create a VPC
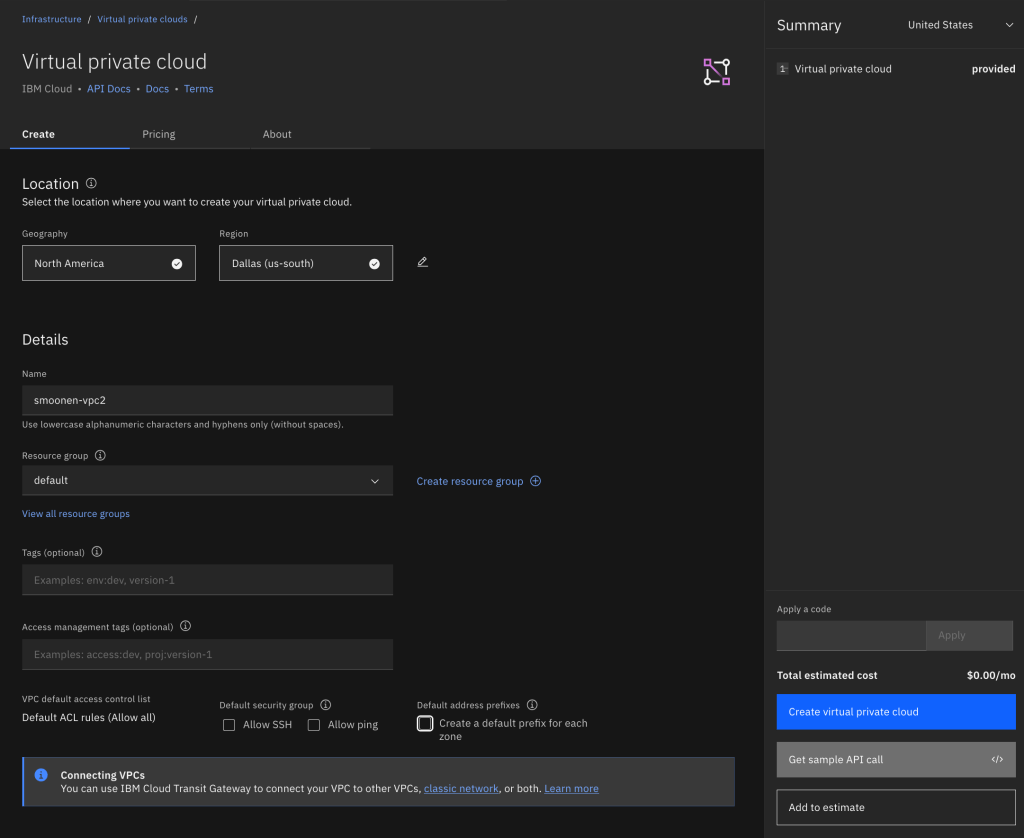
After logging in to your IBM Cloud account, click the “hamburger menu” button in the top-left, then select Infrastructure | Network | VPCs.
From the Region drop-down, select the region of your choice, and then click Create.
As it works currently, if you allow the VPC to create a default address prefix for you, the prefix will be automatically selected for you without your ability to modify it. I prefer to choose my own address prefix and therefore I deselect this checkbox before clicking the Create button.
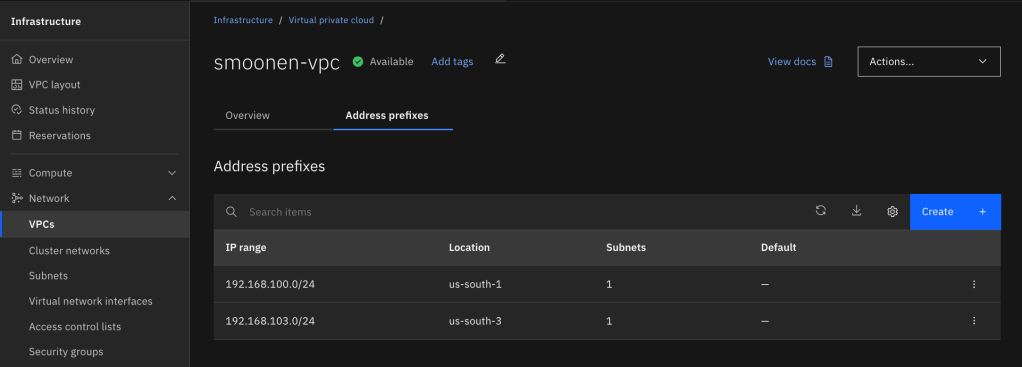
After creating your VPC, view the list of VPCs and click on your new VPC to display its details. Select the Address prefixes tab. For each zone where you plan to create resources or run workloads, create an address prefix. For example, I created a VSI in zone 1 and OpenShift worker nodes in zone 3, so I have address prefixes created in these two zones.
Interestingly, the address prefix is not itself a usable subnet in a zone. Instead, it is a broader construct that represents an address range out of which you can create one or more usable subnets in that zone. Therefore, you need to go to Infrastructure | Network | Subnets and create a subnet in each zone where you will be creating resources or running workloads. Note carefully that you choose the region and name of your subnet before you choose the VPC in which to create it. At that point you can choose which address prefix it should draw from. In my case I used up the entire address prefix for each of my subnets.
For your convenience, I also recommend that you choose to attach a public gateway to your subnet. The public gateway allows resources on the subnet to communicate with public networks, but only in the outbound direction.
Create a jump server
First you should create a security group to restrict access to the jump server. Navigate to Infrastructure | Network | Security groups and click Create. Ensure that your new VPC is selected, create one or more rules to represent the allowed inbound connections, and then create an outbound rule allowing all traffic.
Next, navigate to Infrastructure | Compute | Virtual server instances and click Create.
Select the zone and your new VPC. Note that the VPC selection is far down the page so it is easy to miss this. Choose your preferred operating system image; e.g., Windows Server 2025. Customize the VSI profile if you need more or different horsepower for your VM.
Unless you already have an SSH key, create a new one as part of this flow. The UI will save the private key to your system. Be sure to hold on to this for later.
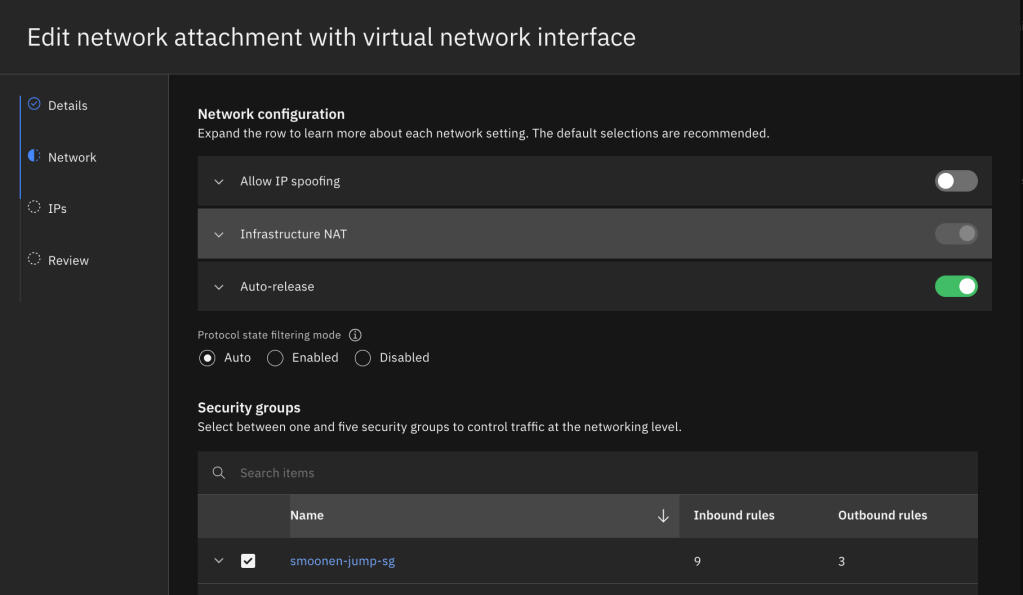
It is fine to take most of the default settings for network and storage unless you prefer to select a specific IP from your subnet. However, you do need to edit the network attachment and select the security group you created above instead of the VPC default group. You’ll notice that the creation of your VSI results in the creation of something called a virtual network interface, or VNI. The VNI is an independent object that mediates the VSI’s attachment to an IP address in your subnet. VNIs serve as an abstract model for such attachments and can be attached to other resources such as file storage and bare metal servers. You could elect to allow spoofing on your VNI (which would be necessary if you wanted your VSI to share a VIP with other VSIs or to route traffic for additional IPs and networks), and also to allow the VNI to continue to exist even after the VSI is deleted.
Click Create virtual server.
Jump server authentication
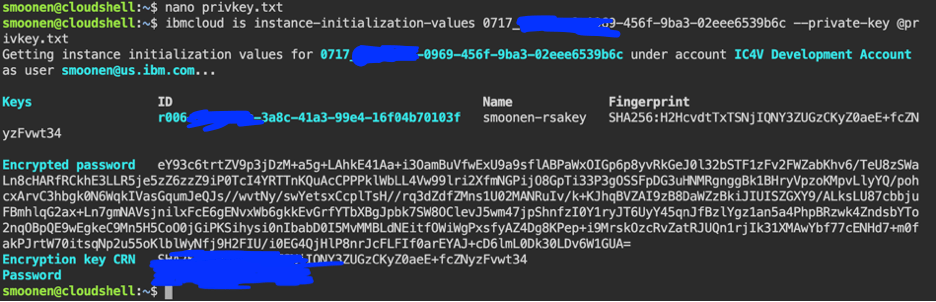
If you created a Linux jump server, you can use the SSH private key created earlier to connect to your jump server using SSH. However, if you created a Windows jump server, the Administrator password is encrypted using the SSH key you created earlier. Here is how you can decrypt the Administrator password using this key. Select your VSI. On the instance details panel, copy the VSI instance id.
Click the IBM Cloud Shell icon in the top right corner of the IBM Cloud UI. This will open a new tab in your browser. Ensure that your region of choice is selected.
Within the IBM Cloud Shell in your browser, run a common editor to create a new privkey.txt file in the cloud shell; e.g., vi privkey.txt or nano privkey.txt. Locate the private key file that was downloaded to your system, copy its contents, paste them into the cloud shell editor, and save the file. Then run the following command in the Cloud Shell, substituting the VSI instance ID which is visible in the VSI details page:
ibmcloud is instance-initialization-values 0717_368f7ea8-0879-465f-9ab3-02ede6549b6c --private-key @privkey.txt
For example:
Public IP address
The last thing we need to do is assign a public IP to our jump server. Navigate to Infrastructure | Network | Floating IPs and click Reserve.
Select the appropriate zone, then select the jump server as the resource to bind to. Click Reserve. Note that we did not have to apply our security group at this point because it has already previously been applied to the VSI interface.
Note the IP that was created for you. You can now connect to your jump server using this IP and either the SSH key or password from earlier in this procedure.
In the VMware world, there is presently a lot of interest in alternative virtualization solutions such as RedHat’s OpenShift Virtualization. In the past I’ve used RedHat Virtualization, or RHEV. RedHat has discontinued their RHEV offering and is focusing their virtualization efforts and investment in OpenShift Virtualization instead. In order to become familiar with OpenShift Virtualization I resolved to experiment with it via IBM Cloud’s managed OpenShift offering, RedHat OpenShift on IBM Cloud, affectionately known as “ROKS” (RedHat OpenShift Kubernetes Service) in my circles.
My colleague Neil Taylor was tremendously helpful in providing background information to familiarize myself with the technology for the purposes of my experiment. He has written a series of blog posts with the purpose of familiarizing VMware administrators like myself with OpenShift Virtualization and specifically the form it takes in IBM Cloud’s managed offering. If you are interested in following along with my experiment, you should read his articles first:
I expect that in the future we will see IBM Cloud ROKS adopting the new user-defined networking capabilities that are coming to OpenShift Virtualization soon, but I expect it will take some time to operationalize these capabilities in the IBM Cloud virtual private cloud (VPC) environment. In the meantime I’m content to experiment with virtualization within the limits of Calico networking.
It’s a common problem that you want to delete an IBM Cloud Key Protect instance but there are still some keys remaining in that instance. For your protection, Key Protect and Hyper Protect Crypto Services require you to take action to delete those keys rather than allowing you to delete them as a side effect of deleting the Key Protect instance itself.
This is challenging if you have a large number of keys. That may be the case if you have a development or test environment that you are cleaning up, or if you have migrated your keys to another key provider.
If your Key Protect instance is private-only you may need to export the KP_PRIVATE_ADDR environment variable to point to the service endpoint or VPE for Key Protect in your region. Next you need to identify the instance id for your Key Protect instance, which you can find in the instance details tab in the IBM Cloud UI, or by using the following command if you know the instance name:
$ ibmcloud resource service-instance smoonenKPmadrid --id
Retrieving service instance smoonenKPmadrid in all resource groups under account Development Account as smoonen@us.ibm.com...
crn:v1:bluemix:public:kms:eu-es:a/3f1b08d9abdc5d98ffeb0d3bdc279c04:1f8011c9-7fd9-4fe9-af5e-2fefcfda8cfc:: 1f8011c9-7fd9-4fe9-af5e-2fefcfda8cfc
You can save typing or pasting in subsequent commands by exporting the instance id:
If you are confident that all of these keys can be safely deleted, and you have the appropriate permissions to do so, in your shell session you can loop through these and issue a delete command for each of them:
If any of the keys is known to be in use by a resource, you will receive an error. You may also receive other errors, for example, if you do not have sufficient permission to delete the key. You’ll have to rectify these issues before you can successfully delete the key and the Key Protect instance. For example, the following key was a root key that was in use by a Key Protect KMIP adapter:
Targeting endpoint: https://eu-es.kms.cloud.ibm.com
Deleting key: 'b262754c-f30d-4b5f-984c-f9c21b7ae13a', from instance: '1f8011c9-7fd9-4fe9-af5e-2fefcfda8cfc'...
FAILED
ASSOCIATED_KMIP_ADAPTER_ERR
The key cannot be deleted because it is associated with 1 KMIP adapter(s) in the instance
Correlation-ID:ef7ae793-945f-4b10-aa4b-f24b340bb3e1
Site 'IBM VCFaaS Multitenant - SYD', ID 1a4bb41e-f3ce-4b1f-bdb9-b0a77cf83f50, in region au-syd
  pVDC 'SYD04', ID be95acb1-ba8f-466b-b796-22dcd648fd15, in location syd04 supporting provider types: on_demand, reserved
  pVDC 'SYD05', ID 1c4ea91b-fb36-4cd8-9ef7-6fd098db59c7, in location syd05 supporting provider types: on_demand, reserved
Site 'IBM VCFaaS Multitenant - SAO', ID 01b0b968-1e74-44ef-b014-0aa85eacf188, in region br-sao
  pVDC 'SAO01', ID 515eb4e2-49d6-44c3-8a12-2ea12abda116, in location sao01 supporting provider types: on_demand, reserved
Site 'IBM VCFaaS Multitenant - TOR', ID 6352e951-70f6-497f-a80f-94dff58c0734, in region ca-tor
  pVDC 'TOR04', ID de4be466-dfb9-48d4-9d28-657657fef571, in location tor04 supporting provider types: on_demand, reserved
  pVDC 'TOR05', ID 132f3818-0060-4e3e-90db-8b117416fb27, in location tor05 supporting provider types: on_demand, reserved
Site 'IBM VCFaaS Multitenant - FRA', ID 1fff1209-55b8-4667-b737-0e6de5cf5756, in region eu-de
  pVDC 'FRA02', ID f34e7a9f-afb4-430e-86d8-6b1978aebb9c, in location fra02 supporting provider types: on_demand, reserved
  pVDC 'FRA04', ID c66ac0a4-5e52-4b5e-9387-6bb8de7e42b1, in location fra04 supporting provider types: on_demand, reserved
Site 'IBM VCFaaS Multitenant - MAD', ID 8cef7547-3e44-4288-b849-1cd748e7d954, in region eu-es
  pVDC 'MAD02', ID e917160f-54b0-4a01-ac59-f9e23f44e8bd, in location mad02 supporting provider types: on_demand, reserved
Site 'IBM VCFaaS Multitenant - LON', ID f7074684-de9c-42e9-93a5-0358fcb2bf92, in region eu-gb
  pVDC 'LON04', ID 25e910c2-c790-4550-a316-03efa7c29888, in location lon04 supporting provider types: on_demand, reserved
  pVDC 'LON06', ID a24bbff9-8c79-44ab-8bb1-7699f304a1d1, in location lon06 supporting provider types: on_demand, reserved
Site 'IBM VCFaaS Multitenant - TOK', ID 3dca2ae4-fdea-4791-8092-0c879daa2097, in region jp-tok
  pVDC 'TOK02', ID 029c7ff7-da97-48ea-8ed9-0b86c2918f82, in location tok02 supporting provider types: on_demand, reserved
  pVDC 'TOK04', ID 08b78261-d4c9-41e9-baa9-421b493385f7, in location tok04 supporting provider types: on_demand, reserved
Site 'IBM VCFaaS Multitenant - WDC', ID 25fb5553-72a6-49ca-85b8-f18086cbac0b, in region us-east
  pVDC 'WDC06', ID 595d7f76-b1b2-429f-bb67-e357befa9da7, in location wdc06 supporting provider types: on_demand, reserved
  pVDC 'WDC07', ID efc17eff-fb3e-4b56-8252-44657738c539, in location wdc07 supporting provider types: on_demand, reserved
  pVDC 'WDC04-WDC07', ID 9a46dcce-84d1-4fca-a929-42bc2174ffba, in location wdc04 supporting provider types: on_demand, reserved
Site 'IBM VCFaaS Multitenant - DAL', ID 40e701cd-ef86-4d5e-a847-e7c336f11f27, in region us-south
  pVDC 'DAL10', ID f864f016-2c34-4658-95e7-dd3363408d76, in location dal10 supporting provider types: on_demand, reserved
  pVDC 'DAL13', ID 1df84086-b3af-481e-a535-e3554b809aed, in location dal13 supporting provider types: on_demand, reserved
  pVDC 'DAL12', ID 5b4af31c-383b-422b-b297-0ea6ed8af479, in location dal12 supporting provider types: on_demand, reserved
However, if your user ID has permission to act as a trusted profile, you can use your own API key to authenticate as yourself, and then exchange this authentication token for a time-limited token belonging to the trusted profile. You can then use the latter token to perform actions as the trusted profile.
IBM Cloud IAM provides an “assume” API for this purpose. Here is an example of its use:
# Exchange my IAM token for a trusted profile token
tp_exchange = { 'grant_type'   : 'urn:ibm:params:oauth:grant-type:assume',
                'access_token' : headers['Authorization'].split(' ')[1],
                'profile_name' : 'scott-test',
                'account'      : '187851. . .d02e02' }
tp_token = requests.post('https://iam.cloud.ibm.com/identity/token', data = tp_exchange).json()
# Make subsequent calls using the trusted profile identity
headers['Authorization'] = f"Bearer {tp_token['access_token']}"